

Injection molding defects are visible or structural flaws in a molded part, and each one traces to a specific cause in the material, the mold or the machine settings. Common examples include sink marks, warpage, short shots, and weld lines, and each affects the appearance, dimensions or strength of the part in its own way. Each responds to a small adjustment once the cause is identified, which keeps scrap low and supports consistent part quality.
What Are Injection Molding Defects and Where Do They Come From?
Injection molding defects are departures from the intended shape, surface or strength of a molded part. Each one originates in one of four areas, and naming that area narrows the corrective action quickly.
- Material: Moisture in the resin, contamination and an unsuitable grade change how the plastic flows and solidifies.
- Mold design: Wall thickness, gate position (where plastic enters the mold cavity, the hollow space that forms the part), vents (small channels that let air escape) and cooling channels in the injection mold design decide how evenly the plastic fills and cools.
- Process settings: Melt temperature (the temperature of the molten plastic), injection speed, holding pressure and cooling time control each stage.
- Machine condition: Clamping force (the force that keeps the mold halves closed), mold wear and vent condition affect how well the mold stays sealed and filled.
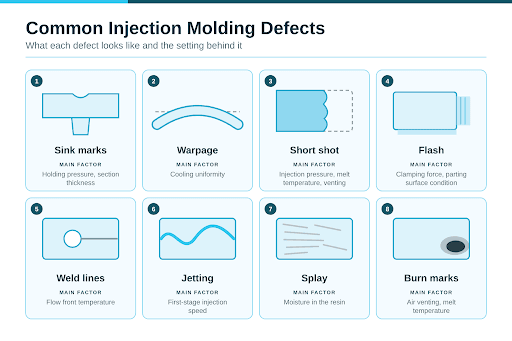
How Do Sink Marks and Warpage Form?
Both of these injection molding defects start with shrinkage, the reduction in size as plastic cools and solidifies. Sink marks are small dents on the surface above thick sections, ribs or bosses (raised mounting points), because the inner plastic shrinks after the outer skin has set. Warpage is a bend or twist that appears when areas of the part cool at uneven rates.
Voids form by the same mechanism as sink marks. A rigid outer skin holds its shape while the interior shrinks, leaving a hollow space.
- Sink marks: Sufficient holding pressure and hold time pack plastic through the gate, and ribs sized as a fraction of the wall they join limit thick sections.
- Warpage: Evenly spaced cooling channels, built during injection mold manufacturing, and uniform mold temperatures let the part cool uniformly and stiffen before ejection.
- Voids: Packing pressure that continues until the gate solidifies fills the space left as the interior shrinks.
What Causes a Short Shot and Flash?
A short shot is an incomplete part because the plastic solidifies or runs out before the cavity is full. Filling depends on injection pressure, injection speed, melt temperature, and the size and condition of the gates and vents. Flash is a thin film of plastic along the parting line, the seam where the two mold halves meet.
- Raise injection pressure, injection speed or melt temperature within the resin's limits so the plastic reaches the end of the cavity.
- Clear the gates and vents, and enlarge the gate or add vents where needed, to give the plastic and the trapped air a clear route.
- Apply sufficient clamping force to keep the mold halves sealed.
Why Do Weld Lines, Jetting and Flow Lines Appear?
Weld lines are visible seams where two streams of plastic, called flow fronts, meet, and the strength of the seam depends on how warm the plastic remains. Jetting is a snake-like mark that forms when plastic enters the cavity at high speed and travels as a narrow stream. Flow lines are wavy ripples that form when the flow front cools before the plastic behind it pushes it forward.
- Weld lines: Suitable melt and mold temperatures keep flow fronts warm enough to fuse, and a well-placed gate moves the seam to a non-critical area.
- Jetting: A controlled first stage of injection and a gate that faces a wall slow the stream until it spreads along the wall.
- Flow lines: Adequate injection speed and mold temperature keep the flow front warm until the cavity fills.
Which Defects Come From Moisture and Heat?
Splay, also called silver streaks, appears as silver or white lines along the flow direction. Some resins, such as nylon, are hygroscopic, meaning they absorb moisture, and that moisture turns to steam during melting. Resin drying to the supplier's specification removes it before plastic injection molding.
Burn marks are dark brown or black areas at the last area to fill, where trapped air is compressed and overheats. A melt temperature outside the resin's rated range, or a long residence time (the time the plastic spends in the barrel), can also decompose the resin.
- Dry hygroscopic resin to the supplier's moisture limit to reduce splay and bubbles.
- Keep the vents at the end of the fill clean so compressed air can leave the cavity.
- Use a controlled final stage of injection to limit the heating of trapped air.
Which Setting Corrects Which of the Injection Molding Defects?
Injection molding defects and solutions pair each defect with a main factor and a first corrective action. Each setting affects the others.
| Defect | Main factor | First corrective action |
|---|---|---|
| Sink marks | Holding pressure, section thickness | Raise holding pressure, thin the section |
| Warpage | Cooling uniformity | Keep mold temperatures uniform |
| Voids | Interior shrinking behind a rigid skin | Raise holding pressure |
| Short shot | Injection pressure, melt temperature, venting | Raise injection pressure, clear vents |
| Flash | Clamping force, parting surface condition | Raise clamping force, repair the seam |
| Weld lines | Flow front temperature | Raise melt temperature, move the gate |
| Jetting | First-stage injection speed | Reduce first-stage speed |
| Splay | Moisture in the resin | Dry the resin |
| Burn marks | Air venting, melt temperature | Add vents, reduce final-stage speed |
In What Order Should Injection Molding Defects Be Checked?
Checking injection molding defects in a fixed order isolates the cause with the fewest adjustments. Each check removes one possible source.
- Define the defect: Agree on its exact name and appearance.
- Check the material: Confirm the grade and the moisture content of the resin.
- Measure actual temperatures: Read the real melt and mold temperatures, since the machine display shows set points.
- Review process settings: Examine injection speed, holding pressure, and cooling time.
- Inspect the mold and machine: Check vents, gates, parting surfaces, and clamping force.
How Does Radiant Design Support Consistent Part Quality?
An injection mold manufacturing company in India addresses injection molding defects at three points: design, tooling, and production. DFM (design for manufacturability) and mold design settle wall thickness, gate position, vents, and cooling channels before the mold is machined. Injection mold manufacturing then builds those features into the mold, and injection molding and production apply the settings that govern each cycle.