
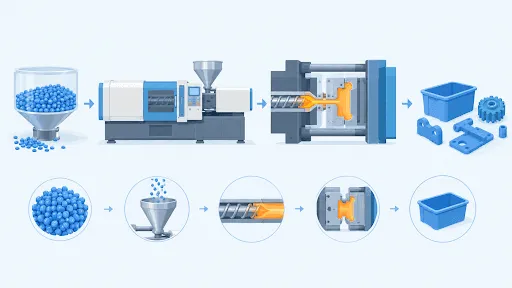
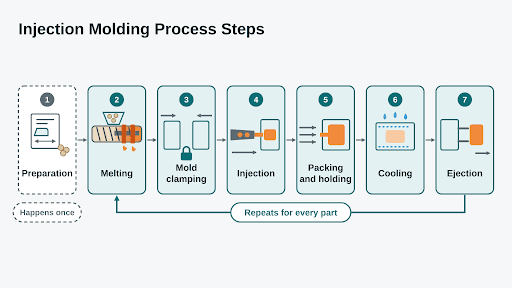
The seven injection molding process steps take a plastic pellet from a bag of granules to a finished part. The plastic injection molding process has one preparation stage, then repeats six actions for every part: melting, mold clamping, injection, packing and holding, cooling, and ejection. Surface finish, weight, and dimensions each trace back to specific settings.
What Are the Injection Molding Process Steps Before Production Starts?
The first of the injection molding process steps takes place long before any pellet melts. This stage starts with a design for manufacturability (DFM) review, which checks the part drawing against molding requirements, and injection mold design then turns the approved part into a mold. Decisions made in this stage, such as resin choice and wall thickness, shape every cycle that follows.
- Material selection: The resin (raw plastic) is chosen for mechanical strength, heat resistance, chemical resistance, and appearance, and mold design accounts for shrinkage as it cools to set the cavity and core dimensions, the mold surfaces that shape the part.
- Design review: Part geometry, including uniform wall thickness, draft angles (slight tapers on the part sides), ribs (thin supporting walls), bosses (cylindrical posts for screws), undercuts (features that block release), and gate locations (where plastic enters the mold), is checked for molding suitability, and the DFM review identifies potential molding concerns.
- Mold manufacturing: The mold halves are machined from suitable tool steel, chosen for production volume and application, with a shrinkage allowance in the cavity and core dimensions, and runners, cooling channels, and ejection mechanisms, such as ejector pins (the small rods that push out the part), are built in.
How Does an Injection Molding Machine Turn Pellets Into Molten Plastic?
A plastic injection molding machine has two main units: the injection unit, which melts and injects the plastic, and the clamping unit, which holds the mold closed. Pellets start in the hopper, a container on top of the machine, and drop into the barrel, a heated cylinder, where heat and a rotating screw produce a uniform melt, which is the molten plastic. The two units work in sequence, with the clamping unit closing the mold before the injection unit delivers the shot.
- Rotation: The screw turns and carries pellets forward.
- Retraction: The screw slides backward and collects a measured amount of melt, the shot, in front of its tip.
- Recovery: The screw builds the next shot while the previous part cools.
Resin drying applies to hygroscopic, or moisture-absorbing, resins such as nylon, polyethylene terephthalate (PET) and polycarbonate, which carry moisture. In the hot barrel, this moisture breaks the polymer down, a reaction called hydrolysis, which weakens parts and leaves silver streaks on the surface known as splay. Resin suppliers publish the recommended drying temperature, time and moisture limit for each grade.
- Nylon, PET and polycarbonate: Moisture sits inside the pellet, so a dehumidifying dryer is used.
- Polyethylene and polypropylene: These resins take up little moisture, so they usually go to the hopper as supplied.
- Hopper time: Dried resin left in the hopper can reabsorb moisture.
How Does Mold Clamping Prepare the Mold for Injection?
The machine closes the mold halves and locks them together. The force required depends on the projected area, the area of the part seen from the direction the mold opens, and on the melt pressure inside the mold. A sealed mold keeps the melt inside the cavity during filling and packing.
- Closing: The clamping unit brings the halves together.
- Locking: Clamping force keeps the halves sealed against melt pressure through filling, packing and cooling.
- Nozzle contact: The nozzle, the tip of the barrel, meets the mold's entry channel, the sprue.
How Does Molten Plastic Fill the Mold?
The screw moves forward and acts as a plunger, pushing the shot into the mold at a programmed speed. The melt travels through the sprue, the runner, a channel that carries it onward, and the gate, the small opening that leads into the cavity, which is the hollow space that gives the part its shape. When the cavity is almost full, the machine changes from speed control to pressure control, a change known as velocity-to-pressure (V/P) switchover that moves the cycle from filling to packing.
- Speed control: The screw advances at a set speed.
- Switchover point: The machine changes mode at a set point, such as the percentage of the cavity filled.
- Pressure control: The screw then holds a set pressure.
What Do Packing and Holding Pressure Do to the Part?
Plastic shrinks as it cools, so the machine keeps pushing additional melt into the mold after filling to fill the space that shrinkage leaves. Holding pressure then keeps the packed melt in place until the gate freezes, meaning it has solidified and sealed the mold. Together, packing and holding set the weight and dimensions of the part.
- Packing phase: Additional melt compensates for shrinkage and sets consistent part weight.
- Holding phase: The packing pressure stays on until the gate seals and is then released.
- Gate size: The gate seals when its plastic solidifies, so its size sets the holding time.
What Happens During the Cooling Step?
Heat removal begins the moment plastic touches the mold, so cooling overlaps with filling and packing and continues until the part is rigid. Cooling forms a major part of the cycle, and cooling time rises roughly with the square of wall thickness. Because heat leaves the part through the mold surface, wall thickness has a direct effect on how long the part stays in the mold.
- Wall thickness: Uniform walls cool evenly, which keeps the part flat.
- Water channels: Channels built into the mold during injection mold manufacturing carry cooling water that removes heat.
- Mold temperature: Stable mold temperature supports consistent surface quality.
How Are Finished Parts Ejected and Inspected?
Once the part is rigid, the clamping unit opens the mold and the ejector system pushes the part out. The draft angles added in the design review help the part release smoothly. Once the part leaves the mold, the mold closes and the next cycle begins.
- Ejection: Ejector pins or the ejector system move the part out.
- Trimming: In cold runner molds, where the runner solidifies with the part, sprues and runners are trimmed off and can be ground up for reuse.
- Inspection: Parts are checked for dimensions and appearance.
Which Injection Molding Process Steps Control Part Quality?
Packing, holding and cooling are the injection molding process steps that usually drive dimensional accuracy and warpage, which is the bending of a part as it cools. Reviewing all seven injection molding process steps during design links design choices to quality outcomes. Each row connects a machine setting to a result that can be measured on the finished part.
| Step | Key setting | Part quality it controls |
|---|---|---|
| 1. Preparation | Resin, mold design | Shrinkage allowance, wall uniformity |
| 2. Melting | Barrel temperature, moisture | Melt consistency, splay |
| 3. Mold clamping | Clamping force | Sealed mold, flash (plastic at the seam) |
| 4. Injection | Injection speed, switchover point | Short shots (incomplete parts), weld lines (visible seams) |
| 5. Packing and holding | Packing pressure, hold time | Weight, dimensions, sink marks (surface dents) |
| 6. Cooling | Mold temperature, cooling time | Warpage, sink marks |
| 7. Ejection | Ejection speed, draft angle | Ejector marks, part distortion |
How Do the Injection Molding Process Steps Repeat in a Production Cycle?
After preparation, the machine runs a fixed sequence of actions for every part. The cycle begins when the mold closes and clamping force is applied, and it ends when the mold opens and the ejector pins release the finished part. Because the screw collects the next shot while the part cools, the repeating steps overlap, and the cycle continues from one part to the next.
A mold with several cavities forms several parts in each cycle, and every cavity follows these steps. A steady cycle therefore supports consistent parts across a production run.
- Mold close: The clamping unit closes and locks the mold at the start of each cycle.
- Fill, pack and hold: The shot enters the cavity, and pressure keeps it packed until the gate freezes.
- Cooling and recovery: The part cools in the mold while the screw collects the next shot.
- Mold open and ejection: The mold opens, the ejector pins release the part, and the cycle starts again.
How Does Radiant Design Support These Injection Molding Process Steps?
A search for an injection mold manufacturing company in India leads to three services that support the injection molding process steps: DFM and mold design; injection mold manufacturing; and injection molding and production. Together, these services take a part from approved design to finished mold and then to production.
Frequently Asked Questions
How many steps are in the plastic injection molding process?
Seven steps cover the full process: preparation, melting, mold clamping, injection, packing and holding, cooling and ejection. The first happens once, and steps two to seven repeat for every part. Some sources group these actions into four to six steps.
Why is plastic resin dried before molding?
Hygroscopic resins such as nylon carry moisture that breaks the polymer down in the hot barrel, which weakens parts and leaves silver streaks. Drying removes that moisture first. Resin suppliers publish the drying temperature, time and moisture limit in their technical documents.
How do packing pressure and holding pressure work?
Packing pushes additional melt into the mold to fill the space left by shrinkage. Holding keeps pressure on the melt until the gate freezes, which is when it solidifies. Many manufacturers set one pressure and one time for both and call the combined phase holding.
What determines cooling time in injection molding?
Cooling begins when plastic touches the mold and ends when the part is rigid enough to be pushed out. Cooling time rises roughly with the square of wall thickness.
What happens to the sprue and runner after ejection?
In many molds, the sprue and runner solidify with the part and are separated by trimming. The removed plastic can be ground up and reused where the resin and part requirements allow.